『紙板』 cardboard 雖有大用,一般常以之為『微物』。若說拿它來做『立體頭盔』,恐怕難以置信。不過谷歌卻發表了個
Google Cardboard
Google Cardboard is a virtual reality (VR) platform developed by Google for use with a head mount for a smartphone. Named for its fold-out cardboard viewer, the platform is intended as a low-cost system to encourage interest and development in VR applications.[1][2] Users can either build their own viewer from simple, low-cost components using specifications published by Google, or purchase a pre-manufactured one. To use the platform, users run Cardboard-compatible applications on their phone, place the phone into the back of the viewer, and view content through the lenses.
The platform was created by David Coz and Damien Henry, Google engineers at the Google Cultural Institute in Paris, in their 20% “Innovation Time Off“.[3] It was introduced at the Google I/O 2014 developers conference, where a Cardboard viewer was given away to all attendees. The Cardboard software development kit (SDK) is available for the Android and iOS operating systems; the SDK’s VR View allows developers to embed VR content on the web as well as in their mobile apps.[4]
Through March 2017, over 10 million Cardboard viewers had shipped and over 160 million Cardboard app downloads had been made. Following the success of the Cardboard platform, Google announced an enhanced VR platform, Daydream, at Google I/O 2016.
 Second-generation Google Cardboard viewer


A Cardboard viewer unassembled (top) and assembled (bottom)
有興趣了解『設計』者,可以參考
‧ https://www.google.com/get/cardboard/downloads/wwgc_manufacturers_kit_v1.2.zip
‧ http://www.google.com/get/cardboard/downloads/wwgc_manufacturers_kit_v2.0.zip
若問為什麼需要『透鏡』呢?因為『明視距離』吧︰
放大鏡之歷史久遠矣︰
放大透鏡的歷史可追溯至古埃及,約西元前五世紀,以埃及的象形文字表示「一片玻璃透鏡」。最早的文字記載則可追溯到古羅馬,約公元前一世紀,羅馬皇帝尼祿的導師塞內卡寫道「無論多小或模糊的文字,透過球體或注滿水的玻璃壺就會放大」。[1]亦有一說尼錄皇帝曾以一個祖母綠寶石當做凸透鏡來觀賞鬥士比賽。[2]
早於千多年前,人們已把透明水晶或寶石磨成「透鏡」,這些透鏡可放大影像。
一位喜歡觀察自然萬物的人,也許早已見過它多變的形貌也︰
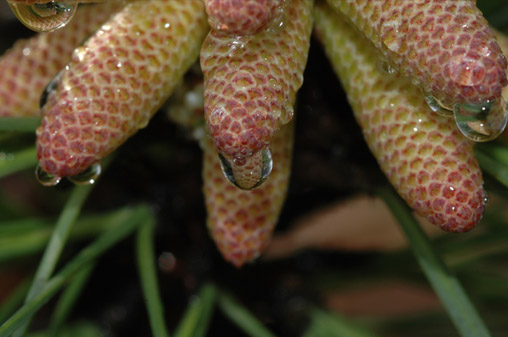
Water Droplet as a Simple Magnifier
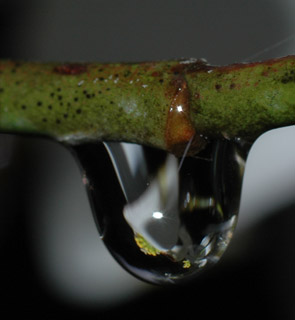 |
A water droplet can act as a simple magnifier and magnify the object behind it. Water tends to form spherical droplets under the influence of surface tension. When attached to an object like these examples, the spherical shape is distorted, but still capable of forming an image. Above the droplets are on tiny emerging pine cones. At left the droplet forms a partial image of the flower that is out of focus behind it. |
所謂明視距離,也稱作近點,就是眼睛能聚焦清晰成像的最短距離 ,成年人通常大約是  公分。因此在觀察小東西時。需要放大鏡才能看的更清楚物件之紋理。若將放大鏡緊貼眼睛,就彷彿相機加裝近攝鏡一樣,因此可以更近的距離觀物︰


而且  。從
。從  ,解之得
,解之得

 。因為
。因為
 ,所以
,所以


假使單從放大鏡成像來講,

前 焦距內之物  越靠近焦點
越靠近焦點  ,虛像將趨近於與物同邊之無窮遠處
  。若以接續成像來講,此時眼睛與放大鏡中間的距離,對比下大可以忽略不計。因此從相對角放大率觀之,

的了。不過還是多讀讀幾家文本,加深印象與理解的好耶☆
── 摘自《光的世界︰【□○閱讀】樹莓派近攝鏡‧下‧答之合》
如果打算詳細解讀,以及改善設計者,得多點光學知識耶!!
‧ …
或樂聞人們在論壇之議論乎??
google cardboard python VR
If anyone’s interested in 3D viewing of 3D models:
Someone asked me if pi3d could use the google cardboard viewer and, as it was something I had thought about previously, I added a class to allow this to be done quite easily.
It’s actually even easier to simply make alternate frames show from left or right eye position. All that’s needed then is a rotating disk that occludes each eye for half the time and rotates at the same speed as the FPS. Can’t see any issues with this (apart from problems of synchronisation, epilepsy, gyroscopic forces, motors fixed to ones nose, disks spinning near to face…)
It’s possible to get a stereo effect, even on this poor youtube rendition, by going slightly cross-eyed. Easier if you block out the opposite image with each hand (or cardboard) as per picture.
- stereocam01.jpg (35.71 KiB) Viewed 1996 times
- DSCF2244.JPG (41.29 KiB) Viewed 1946 times
Raspberry Pi challenge to the high tech cardboard of Google. This version contains no lenses, velcro or magnetic washer. 100% cardboard (OK a small amount of sellotape, bulldog clips and lead trimmings)
If your eyes are x apart, the screen is y from your eyes, and the Display window is W by H (W is the width including both views) then
w = x * W / (W + 2 * x)
h = 2 * w * H / W
L = 2 * y * w / W
※ 註
Introduction to pi3d

pi3d written by Tim Skillman, Paddy Gaunt, Tom Ritchford Copyright © 2012 – 2017
Here is a link to an excellent, self explanatory YouTube video made by Peter Farrell that covers much of the content of this ReadMe.
There’s plenty of 3D code flying around for the Raspberry Pi, but much of it is rather complicated to understand and most of it can sit under the bonnet!
pi3d is a Python module that aims to greatly simplify writing 3D in Python whilst giving access to the power of the Raspberry Pi GPU. It enables both 3D and 2D rendering and aims to provide a host of exciting commands to load in textured/animated models, create fractal landscapes, shaders and much more.
The pi3d module runs on platforms other than the Raspberry Pi (On Windows using pygame, on linux using the X server directly and on Android using python-for-android) and runs with python 3 as well as 2. The OpenGLES2.0 functionality of the Raspberry Pi or Android is used directly or via mesa or ANGLE on ‘big’ machines. This makes it generally faster and opens up the world of shaders that allow effects such as normal and reflection maps, blurring and many others. It has various demos of built-in shapes, landscapes, model loading, walk-about camera and much more! See the demos on github.com/pi3d/pi3d_demos and experiment with them ..
If you are reading this document as the ReadMe in the repository then you can find the full version of the documentation here http://pi3d.github.com/html/index.html
回顧前瞻的步伐幾曾停歇哩☆