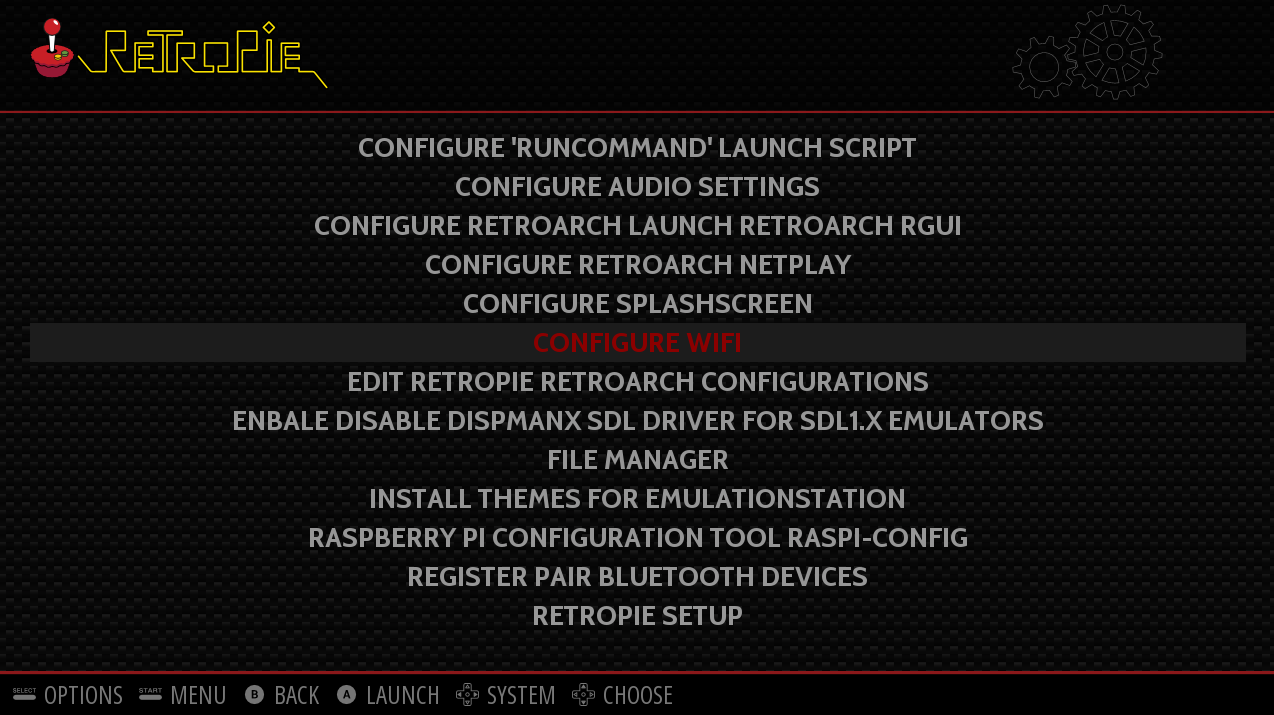
分類彙整: 樹莓派之學習

W!o+ 的《小伶鼬工坊演義》︰【新春】 復古派 《三》 RetroPie 選單

如果我們已經成功安裝配置了 RetroPie ,那麼將可以用自己設定的『』方向鍵輪詢 EmulationStation 『遊戲機主選單』。

EmulationStation-UI


這個『選單系統』一般使用『A』鍵『進入』子選單,用『B』鍵『離開』子系統。EmulationStation 自己的『主選單』可用『Start』鍵快捷進入,其中『 CONFIGURE INPUT 』之選項可以重新定義使用者界面操作的『首選裝置』;若是誤入脫離辦法一定得使用鍵盤之『ESC』鍵?還是得再重新定義一次的呢!

對於不熟悉『選單系統』概念之讀者,下面文本或許有點幫助︰

早期使用 PC 的人都知道『Ctrl + Alt + Del 』這個『組合鍵』── 又稱『三指禮敬』鍵 ──,在 PC DOS 年代由 IBM 的首席工程師 David Bradley 先生所創 ── 由軟體按鍵觸發的系統『重新開機reboot,他同時也是 IBM PC ROM-BIOS  開機程式的攥寫人。這個暱稱為『復活蛋』的組合鍵,根據 IBM 官方的技術文件是這樣說明的︰

僅供』程式設計師使用,不對大眾開放,『用於』免關機就能重新啟動 PC 一事 。

左手』先按下Ctrl不放,『 + 接著按下』 Alt不放,此時用『右手』同時『 + 接著按下』Del 一鍵。

這個『依序同時』按鍵的想法,開啟了後來一系列的軟體仿效應用,為日後的『快捷鍵』舖平了道路。本來此事早已落幕,然而去年九月 21 日微軟創始人比爾.蓋茲在哈佛大學時,卻說這個『復活蛋』是個『錯誤的設計』,起因於當年的 IBM 工程師不願意給 MicroSoft 他們一的『單獨』的鍵來作此類用途,又起了波瀾!不論人們怎麼想,一個概念 『其來有自』,知道淵源容易了解它說的是什麼?或許又能怎麼用。在談 raspi-config 使用前,先說說『選單系統』的『架構』想法吧。『選單』menu 的想法非常古早,事實上,當你在餐館裡看著『菜單』對著服務生『點菜』時,就已實踐了『人對人』的『點菜系統』了。如果把這裡的『人對人』換成『人對電腦』、『菜單』變成『選單』、『點菜』改成『點選』後,就是所說的選單系統。因著「點選裝置」的不同 ── 鍵盤、滑鼠、觸控面板、… ── ,『使用的友善性』user friendly 也不一樣,就目前的選單系統軟體設計上來講,大體早已『定型化』了── 人因工學使然 ──。也許好處是說了一個,就說了全部。

sudo raspi-config 是個終端機上的應用程式,使用的是用鍵盤操作的『文字選單系統』。一般選單的結構,就像檔案系統一樣,如果把選單比做『貼了選單標籤的箱子』,這個箱子裡可以裝著『選項』或是『子選單箱子』。所以要有著『進入』子選單︰Enter,『回到』母選單︰Esc的辦法。為著使用的友善性,就像手機上的『接聽鍵』和『掛斷鍵』一樣,文字界面上有〈 Select 〉進入、〈 Finish 〉結束、〈 Back 〉回去…等等選單脈絡『操作項』,可以按下Tab輪選。此時標示『當下選項』── 紅色『選單桿』 menu bar ──,會變成藍色選單桿,告知正操作的是『這個選項』。由此推想移動選單桿應該是用按鍵了。當你操作這個選單系統時,你還得使用空白鍵,它是個『兩態跳態鍵︰對某個選項來說,如果它沒被選上,按下就是;如果已被選上,按下就是不選

─── 摘自《一條漫漫長路︰中文化視窗


一旦你選擇了『模擬器』,開始『遊戲』,你就進入了『遊戲機』主控的世界,這裡已經不是 EmulationStation 管轄的天地了,那麼我們將如何離開這個『遊戲』呢?由是 RetroArch 主導的『模擬器 』才有一『共通』的『脫離鍵 Exit 』『Select』 + 『Start』鍵耶!

然而並非所有的『模擬器』都是由 RetroArch 主導的,舉例來說

AdvanceMAME 』︰

請參照《 Documentation of the AdvanceMAME advv utility  》與《 Documentation of the AdvanceMAME advmame program 》文件進行操作。此處僅列出預設的鍵盤用法︰

In the game play you can use the following keys:

ESC  Exit.
F1  Help.
TAB  Main Menu.
F2 Test/Service Switch.
F3  Reset the game.
F7  Load a game state.
SHIFT + F7  Save a gam state.
F8  Decrease the frame skip value.
F9  Increase the frame skip value.
F10  Speed throttle.
F11  Display the frame per second.
F12  Save a snapshot.
P  Pause.
PAD  *  Turbo mode until pressed.
PAD  /  Cocktail mode (flip the screen vertically).
PAD   Mark the current time as the startup time of the game.
CTRL + ENTER  Start the sound and video recording.
ENTER  Stop the sound and video recording.
,  Previous video mode.
.  Next video mode.
TILDE  Volume Menu.

for player 1 you can use the keys:

1  Play.
5  Insert coin.
ARROW  Move.

, , , Move.
CTRL  First button.
ALT  Second button.
SPACE  Third button.

for player 2 you can use the keys:

2  Play.
6  Insert coin.
R , F , D , G Move.
A  First button.
S  Second button.
Q  Third button.

for AdvanceMESS are available also the following keys:
ScrollLock Switch to partial keyboard emulation which lets you use keys like TAB, ALT and CTRL.

─── 摘自《音樂播放器之 CD 轉成 mp3 之《補充》 MAME?!


這時想要離開遊戲,怕得使用鍵盤之『ESC』鍵的了!!!


W!o+ 的《小伶鼬工坊演義》︰【新春】 復古派 《二》 RetroPie 安裝

若說在樹莓派上安裝與啟動樹莓派基金會之 raspbian OS 十分簡單,事實上假使不知道『預設』者,也只能到作業系統的『 login 』大門而已。非得知道『預設』使用者是『 pi 』,以及『預設』使用者之密碼為『 raspberry 』才能『入門』登堂。

因此首次面對『 RetroPie 』此一龐大複雜系統的人,務須詳讀

First Installation

HerbFargus edited this page · 59 revisions

RetroPie


Version
3.5
  1. Hardware
  2. Installation
  3. Controller Configuration
  4. Configure Wifi
  5. Transferring Roms

Congratulations! You have discovered the wonderful world of RetroPie- your entire childhood is within reach! RetroPie is a combination of multiple projects including RetroArch, EmulationStation, and many others.

This page is for people just getting started on RetroPie 3.5. The easiest way to install RetroPie is the SD image which is a ready to go system built upon top of the Raspbian OS – this is the method described in the following guide. Alternatively, advanced users can install RetroPie manually.

This guide will give you the very basics to get you up and running from a blank SD card to first boot into EmulationStation.

───


多遍,最好能記下文本中一時還不清楚的『字』與『詞』,方下載『映象檔』開始拷貝安裝。

安裝前請先想像『完成後』 RetroPie 系統的『功能』和『操作』,內有『 RetroPie 』之『系統設定』使用者界面︰

RetroPi-UI


還有『 EmulationStation 』選擇『模擬器』、『選單』、『遊戲』 、『 RetroPie 系統設定』等等使用者界面︰

EmulationStation-UI


安裝後所有的使用者界面之『操作』,源自『首次啟動』時,首選『輸入裝置』── 鍵盤、搖桿、遊戲手柄 …──的『組構』︰

FirstTime-ES-Config-InputDevice


這個『首次組構』也會傳遞構成了『 RetroArch Configuration 』之多種『模擬器』的『預設控制』。因此請慎選『首選設備』,仔細閱讀

RetroArch Configuration

HerbFargus edited this page · 42 revisions

Retroarch Logo


RetroArch is the official front end for the Libretro API which essentially means that RetroArch will be what manages controls and configurations for all of the emulators that are part of the Libretro-Core (i.e. any emulator with an “lr” before it). This is a beautiful thing because it means you can configure controllers only once for many emulators instead of having to configure each emulator individually. RetroArch also gives us the freedom to configure emulators individually as discussed below under “Custom RetroArch Controls” (There are also emulator specific configurations for emulators not part of the libretro core under their respective emulator wiki page.)

Retroarch Controls

There are 3 main ways that RetroArch handles controls:

AutoConfigurations

Starting with Retropie 3.0 retroarch controls have been integrated into emulationstation and will be the first thing you see when you boot from the RetroPie SD image the first time. You can also access it from the start menu within emulationstation under the configure input option. Your joypad is automagically configured for libretro (retroarch) emulators when you configure your controller for the first time in emulationstation. You’ll know if your controller has been automagically configured if you see a flash of yellow text on the bottom of the screen with your gamepad ID when you start a game.

The following diagrams are for the 3 most common controllers: Super Nintendo, Xbox 360, and PlayStation 3. They can be used as a reference when configuring your controllers. Each emulator page on the wiki has a diagram of the original controller for its respective console that will correspond to the same inputs listed below.


SNES-CONTROLLER

……

Hotkeys

Hotkeys are combinations of buttons you can press in order to access options such as saving, loading, and exiting games. The following defaults are set automatically the first time you set up your controller from emulationstation (The numbers will vary depending the controller you use).

Default joypad hotkeys:

Hotkeys Action Code Example
Select Hotkey input_enable_hotkey_btn = “6”
Select+Start Exit input_exit_emulator_btn = “7”
Select+Right Shoulder Save input_save_state_btn = “5”
Select+Left Shoulder Load input_load_state_btn = “4”
Select+Right Input State Slot Increase input_state_slot_increase_btn = “h0right”
Select+Left Input State Slot Decrease input_state_slot_decrease_btn = “h0left”
Select+X RGUI Menu input_menu_toggle_btn = “3”
Select+B Reset input_reset_btn = “0”

───


後,再決定輸入裝置的『按鍵』之『定義』以及『配合』。如是或可祇用一隻搖桿悠遊也。


W!o+ 的《小伶鼬工坊演義》︰【新春】 復古派 《一》 LibRETRO 哲學

雖然我們處於 W!o+ 的時代久遠之前,不過遊戲機的發展一直突飛猛進 ,比方近來新流行的『虛擬實境』 Virtual Reality 一般樣︰

虛擬實境Virtual Reality),簡稱VR技術,也稱人工環境,是利用電腦模擬產生一個三度空間的虛擬世界,提供使用者關於視覺、聽覺、觸覺等感官的模擬,讓使用者如同身歷其境一般,可以及時、沒有限制地觀察三度空間內的事物。使用者進行位置移動時,電腦可以立即進行複雜的運算,將精確的三維世界影像傳回產生臨場感。該技術整合了電腦圖形電腦仿真人工智慧、感應、顯示及網路並列處理等技術的最新發展成果,是一種由電腦技術輔助生成的高技術模擬系統。


。因此對於『古典電玩』而言,現今『任天堂世代』已年華老去,於是相對處境或與 W!o+ 有些類似,到底是否還能存續?總將有賴『復古』者的熱情了!

假使只想嚐嚐樹莓派遊戲機的味道,只需下載,舉例說 PiPLAY 預製的『映象檔』,拷貝後,加載遊戲『 rom 』就可以開始玩了︰

PiPLAY

Welcome

This is the official site of PiPlay, formerly called PiMAME. The pre built Raspberry Pi OS made for gaming and emulation.

Emulated Systems:

  • MAME – AdvanceMAME & MAME4ALL
  • CPS I / CPS II – Final Burn Alpha
  • Neo Geo – GNGeo
  • Playstation – pcsx-reARMed
  • Genesis – DGen
  • SNES – SNES9x
  • NES – AdvMESS
  • Gameboy – Gearboy
  • Gameboy Advance – GPSP
  • ScummVM
  • Atari 2600 – Stella
  • Cavestory – NXEngine
  • Commodore 64 – VICE

Also included is a suite of software designed to reduce the complexity and time needed to setup a fully working system. An updater is included with the distribution.

───


也許『復古』即『創新』,因是我們將循著熱情者的步伐︰

libretro_final_thumb

What is Libretro?

Libretro is a simple but powerful development interface that allows for the easy creation of emulators, games and multimedia applications that can plug straight into any libretro-compatible frontend. This development interface is open to others so that they can run these pluggable emulator and game cores also in their own programs or devices.

With libretro, you can make cross-platform applications that can use rich features such as OpenGL, cross-platform camera support, location support, and more in the future.
retroarch-logo

What is RetroArch?

RetroArch is the official reference frontend for the libretro API.

What is it most commonly used for ?

RetroArch is most popularly known for being a program with which you can play many emulators and games, which have all been customized and tailor-ported to the libretro API.

It is designed to be fast, lightweight, and portable. It tries to be on the cutting edge of technology in terms of technolog supported as well as trying to be as backwards compatible as possible, a paradoxical goal if any. It has features few other dedicated games / emulators have, such as:

……


闡述他們的哲學︰

Our mission, our philosophy – non-compromising in being open and libre

Our mission is your mission. Your best interests are our best interests.

It’s in the best interests of RetroArch as the reference frontend to remain a no-strings attached enduser project. Therefore, we draw a strict line on the following issues:

  • RetroArch as the reference frontend to libretro will always remain free. Free as in libre, AND free as in beer.
  • We don’t believe in spying on you and/or viewing you as a commodity to be exploited and tracked. Therefore, if you use a version of RetroArch that has ads in it, it does not come from us.
  • Monetary donations will not be accepted.
    • The ONLY exception to this rule is gifts in the form of hardware needed for the project. These are at least objectively valid and non-corruptible ways of helping the project since it is hardware we need for testing and porting purposes. If you are one such general soul who feels like helping out in this regard, contact us at libretro@gmail.com.
  • We will never engage in deliberate and shady ‘rebranding’of existing open source projects to make it appear as if the ‘work/port’ is somehow distinct from the main source and as if it is its own entity.
  • We will never try to tempt you to buy into Kickstarter schemes.
  • Unsolicited e-mails regarding monetization middleware will be ignored.
  • We provide all the means to any and all devs to make their own builds/packages from source – unlike others everything we do is immediately committed to Github so whatever you can fetch from source on our Github repositories is exactly the current state of development. Unlike others, everything we commit can be guaranteed to be built by others.

Note – these stances are final. We feel very strongly in them.

───


走入追隨者的世界︰

Home

Florian edited this page · 251 revisions
 RetroPie

Welcome to the RetroPie-Setup wiki!

This wiki is supposed to be created by the users of the RetroPie setup script for the users of the script. Everyone can contribute to it!

Latest News: RetroPie 3.5 SD Image Released! (see changelog)

Getting Started

……


【 RetroPie GUI 】

EmulationStation

EmulationStationA graphical and themeable emulator front-end that allows you to access all your favorite games in one place, even without a keyboard!

───


一探『復古派』遊戲機迷人的天空!!!


W!o+ 的《小伶鼬工坊演義》︰【新春】復古派 RetroPie

聽聞

正月初六“送窮”,是中國古代民間一種很有特色的歲時風俗。其意就是祭送窮鬼(窮神)。窮鬼,又稱“窮子”。

據宋陳元靚《歲時廣記》引《文宗備問》記載:“顓頊高辛時,宮中生一子,不著完衣,宮中號稱窮子。其後正月晦死,宮中葬之,相謂曰‘今日送窮子’。”相傳窮鬼乃顓頊之子。他身材贏弱矮小,性喜穿破衣爛衫,喝稀飯。即使將新衣服給他,他也扯破或用火燒出洞以後才穿,因此“宮中號為窮子”。


。也許送窮之後,果得一夜好眠。記起了前往『幽境夢鄉』路上, Mrphs 所講之

不久後終於抵達北岸 碼頭,空蕩蕩似無人煙。月兒升的更高了,望著眼前土丘,顯的有些淒冷。或許 Mrphs 見我不言不語,因說道︰跨過面前的小山,就到了『幽境夢鄉』。再穿越『幽境夢鄉』,即達《卡夫卡村》。邊聽邊走,登上了山丘,『幽境夢鄉』在目,黑壓壓的 一片,不知何處是盡頭。 Mrphs 又講起︰說來『幽境夢鄉』之名原該是『幽竟夢卿』的古稱。當地原鄉人本叫它『奇幻森林』 ,林內多有五十步高之參天巨木,樹蔭之大可蔽日,又為奇藤異草纏繞,彷彿是個天然暖房。故而林中香草靈芝常生,卵生溼生常居 。遂因此生生不斷,變異驚奇而得名。此林之中央有個『林中道』正是前往《卡夫卡村》的門徑。路底有塊大石,將入村道路分成了東西兩向。誰知一日有人卻意外 的用『紫外線』拍着了這石,之後驚訝的發現其上儼然有圖文。北面刻的是『 幽 竟 』,南面上頭有『 夢 鄉』。故詢之 M♪o ,得其解為『幽竟夢卿』,然而此人以為是 M♪o 誤寫,當是作『幽境夢鄉』,於是延誤至今。這麼一說反而倒讓人好奇起來,故問︰難到 M♪o 沒有分辯。 Mrphs 接答︰據『小學堂』同學講,一回有人問過這事,老師說︰『幽竟夢卿』之本義是『 幽 』幽靜將『 竟 』盡,此景恐不再,或終『 夢 』在夢裡相『 鄉 』向。總帶著點『傷春悲秋』之意。錯讀為『幽境夢鄉』沒什麼不好的吧!!多少可以『安定人心』的啊??

─── 引自《勇闖新世界︰ W!o《卡夫卡村》變形祭︰感知自然‧幽境夢鄉


另一件事。心想舊的一年匆匆已過,新春腳步雖近,然而元宵尚未到來。此一事又與 W!o+ 有關,並且十分有趣,何樂而不為的呢?

話說在 W!o+ 工坊角落裡,有一台他親手打製的『復古遊戲機』。 Mrphs 是這麼說的︰有一回 W!o+ 讀了一本古書,裡面詳細解說了『任天堂世代』【※因是 Tux 語,無有對應者,勉強翻譯。】流行的遊戲機。一時好奇起來,想要效法『古風』,遂用類似先生那兒的『現場可程式邏輯門陣列』 Field Programmable Gate Array, FPGA 仿製。同時還修改了書中所寫之若干『邏輯錯誤』。結果『遊戲』跑起來卻是『影像扭曲』而且『音聲亂調』!折騰好幾天 ,大惑不解?其後四處查找相關古籍,偶見斷簡殘篇講『倣真』之『真仿』︰

MAMELogoTM
Multiple Arcade Machine Emulator

220px-Mspacman_and_galaga_act_like_israel_and_palestine
街頭遊戲機

一九九七年,義大利程式設計師 Nicola Salmoria 開啟了街頭電玩的軟體模擬器發展,當年一月二十九日發表的 DOS 平台的 Multi-Pac v0.8 版, 就是現今著名 MAME 的前身。據知 MAME 的目標在於盡可能的忠實而且精確的模擬各種街機遊戲,它的宗旨為著保存遊戲的歷史,進而避免古老的遊戲恐將遺失或被忘卻。計畫全稱是個縮首字,由 Multiple Arcade Machine Emulator 而得名。

就像 WiKi  上所講的, Philosophy and accuracy 】︰

The stated aim of the project is to document hardware, and so MAME takes a somewhat purist 【純正化】view of emulation, prohibiting 【禁止】programming hacks that might make a game run improperly or run faster at the expense of emulation accuracy. Components such as CPUs are emulated at a low level (meaning individual instructions are emulated) whenever possible, and high-level emulation (HLE) is only used when a chip is completely undocumented and cannot be reverse-engineered 【逆向工程】 in detail. Signal level emulation is used to emulate audio circuitry that consists of analog components.

這大概不只是『 bit by bit 』的『拷貝』而已,或許真的是『克隆』的吧!然而至今『硬體文件』依然付之闕如,這事二零零八年計畫督導者是這麼說的︰

We want to document the hardware. Now a lot of people will say; “Where’s your document? You just write a bunch of source code.” And yes, that’s true. One thing I’ve learned is that keeping documentation synced with source code is nearly impossible. The best proof that your documentation is right is “does this code work“.

Aaron Giles, California Extreme 2008

果真是『大哉辯』的啊!『能用』比之於『能文』到底哪個重要的呢?希望不會有一天又要『再詮釋』一次的吧!!??

─── 摘自《音樂播放器之 CD 轉成 mp3 之《補充》 MAME?!


,突然間有所領悟。因此將所有改正『錯誤』還原,『 bug 』放回 ,果真一切『正常』的了。 W!o+ 也自覺好笑,一直唸著『將錯就錯』實在是其來有自的耶!!??


W!o+ 的《小伶鼬工坊演義》︰ 一窺全豹之系統設計‧探索‧戊

己一

己二

己三

《説文解字》:己,中宮也。象萬物辟藏詘形也。己承戊,象人腹。凡己之屬皆从己。

造字本義:在繩子上繫圈、打結,用以記數和記事,或標明物品的歸屬者。

……

所謂『食色性也,人之大欲存焉。』本就自然而然,只不過

你是誰? Who are you ?

你是怎樣的人? What are you ?

指出了重點,求學中,常常會發現『問題』比『答案』重要!或者至少一樣『重要』!!

因此師法古今中外的『楷模典範』人物,通常容易『思路開闊』,要是還能有個自己的『座右銘』,或許更好的吧。

昭明文選‧崔瑗‧座右銘

崔子玉范曄後漢書曰:崔瑗,字子玉,涿郡人也。早孤,銳志好學,盡能傳其父業。舉茂才,為汲令,遷濟北相,疾卒。

無道人之短,無說己之長。施人慎勿念,受施慎勿忘。戰國策,唐雎謂信陵君曰:人之有德於我,不可忘也;吾之有德於人,不可不忘也。世譽不足慕,唯仁為紀綱。隱心而後動,謗議庸何傷?劉熙孟子注曰:隱,度也。周易曰:君子安其身而後動,易其心而後語。呂氏春秋曰:內反於心不慚,然後動也。無使名過實,守愚聖所臧。越絕書,范子曰:名過實者滅,聖人不使名過實。家語,孔子曰:聰明睿智,守之以愚;功被天下,守之以讓。在涅貴不淄,曖曖內含光。論語,子曰:不曰堅乎?磨而不磷;不曰白乎?涅而不淄。晏子春秋,仲尼曰:星之昭昭,不如月之曖曖。周易曰:含弘光大,品物咸亨。柔弱生之徒,老氏誡剛強。老子曰:人生也柔弱,其死也堅強;萬物草木生也柔脆,其死也枯槁。故堅強者死之徒,柔弱者生之徒也。又曰:柔弱勝剛強。河上公曰:柔弱者久長,剛強者先亡也。行行鄙夫志,悠悠故難量。論語曰:閔子侍側,誾誾如也。子路,行行如也。子曰:若由也不得其死然。鄭玄曰:行行,剛強貌。慎言節飲食,知足勝不祥。周易曰:君子以慎言語,節飲食。老子曰:知足不辱。行之苟有恆,久久自芬芳。郭璞三蒼曰:苟,誠也。

因為最終人成為了自己『習慣』作的那種人!這也就是『信念』的重要性!需知養成良好的『習慣』並非『教條』,而是一種『學習過程』的成果。

─── 摘自《《派生》 Python 作坊【己】楷模典範


歲末年終之時,喜聞『 Hexxeh/rpi-firmware 』更新,樹莓派將進入『 VC4/DRM 』顯示加速的時代︰

rpi-4.1.y pull: vc4: kernel-side fix for X rendering lag, plus 3D testing fix #1268

Next up I’ll send updates for userspace to be rebuilt, but this is a major bugfix for vc4 DRM.

Also note the /debug/dri/0/bo_stats and /gem_exec debugfs nodes, which may be useful to watch when bug reporting for issues like the rendering lag/OOM ones we’ve had.

……

# Overlay

Name:   vc4-kms-v3d
Info:   Enable Eric Anholt's DRM VC4 HDMI/HVS/V3D driver. Running startx or
        booting to GUI while this overlay is in use will cause interesting
        lockups.
Load:   dtoverlay=vc4-kms-v3d
Params: <None>


此刻正進入

# rpi-update 主流版本

pi@retropie:~ cat /proc/version  Linux version 4.1.17-v7+ (dc4@dc4-XPS13-9333) (gcc version 4.8.3 20140303 (prerelease) (crosstool-NG linaro-1.13.1+bzr2650 - Linaro GCC 2014.03) ) #834 SMP Mon Feb 1 15:17:54 GMT 2016 pi@raspberrypi ~ 


隨著斗轉星移,過去曾經麻煩的事情

Bit-banged I²C kernel driver

by kadamski » Tue Apr 16, 2013 10:10 am

I’ve made a handy kernel module for everybody wanting to use bit-banged host instead (or in addition to) hardware one. It’s like a wrapper for i2c-gpio kernel built-in module that let you dynamically create and remove i2c hosts on different gpio pins. It can be handy if you experience problems with hardware i2c clock stretching or you need more i2c hosts for some reason.

The code and some instructions can be found on my github. You need a custom kernel (with CONFIG_I2C_GPIO enabled) in order to use it. It got some limited testing so it should work but of course I don’t guarantee anything.

Anybody interested in testing this?

……

也已經簡單了。

# Overlay

Name:   i2c-gpio
Info:   Adds support for software i2c controller on gpio pins
Load:   dtoverlay=i2c-gpio,<param>=<val>
Params: i2c_gpio_sda             GPIO used for I2C data (default "23")

        i2c_gpio_scl             GPIO used for I2C clock (default "24")

        i2c_gpio_delay_us        Clock delay in microseconds
                                 (default "2" = ~100kHz)

※請參考『 Linux/drivers/i2c/busses/i2c-gpio.c


或許我們也應從善如流,一探春花春景的耶!!

【 dtoverlay=i2c-gpio 】

使用 i2c-gpio 預設值︰ GPIO23 是 SDA , GPIO24 為 SCL ,串接回硬體 I2C : GPIO0 SDA , GPIO1 SCL 。因此樹莓派上有兩個 I2C Master 。

Bit-Banging-I2C


pi@raspberrypi ~ ls /dev/i2c* -l crw-rw---- 1 root i2c 89, 1  1月 29 14:52 /dev/i2c-1 crw-rw---- 1 root i2c 89, 3  1月 29 14:52 /dev/i2c-3 pi@raspberrypi ~ 


都可定址 GrovePi 也。

pi@raspberrypi ~ i2cdetect -y 3      0  1  2  3  4  5  6  7  8  9  a  b  c  d  e  f 00:          -- -- 05 -- -- -- -- -- -- -- -- -- --  10: -- -- -- -- -- -- -- -- -- -- -- -- -- -- -- --  20: -- -- -- -- -- -- -- -- -- -- -- -- -- -- -- --  30: -- -- -- -- -- -- -- -- -- -- -- -- -- -- -- --  40: -- -- -- -- -- -- -- -- -- -- -- -- -- -- -- --  50: -- -- -- -- -- -- -- -- -- -- -- -- -- -- -- --  60: -- -- -- -- -- -- -- -- -- -- -- -- -- -- -- --  70: -- -- -- -- -- -- -- --                           pi@raspberrypi ~ i2cdetect -y 1
     0  1  2  3  4  5  6  7  8  9  a  b  c  d  e  f
00:          -- -- 05 -- -- -- -- -- -- -- -- -- -- 
10: -- -- -- -- -- -- -- -- -- -- -- -- -- -- -- -- 
20: -- -- -- -- -- -- -- -- -- -- -- -- -- -- -- -- 
30: -- -- -- -- -- -- -- -- -- -- -- -- -- -- -- -- 
40: -- -- -- -- -- -- -- -- -- -- -- -- -- -- -- -- 
50: -- -- -- -- -- -- -- -- -- -- -- -- -- -- -- -- 
60: -- -- -- -- -- -- -- -- -- -- -- -- -- -- -- -- 
70: -- -- -- -- -- -- -- --                         
pi@raspberrypi ~ </pre>    <span style="color: #808080;"><strong>【 Bit-banged I²C 嚐鮮 】</strong></span> <pre class="lang:default decode:true "># 修改 grovepi.py ,選用 bus = smbus.SMBus(3) 。  pi@raspberrypi ~/example python
Python 2.7.9 (default, Mar  8 2015, 00:52:26) 
[GCC 4.9.2] on linux2
Type "help", "copyright", "credits" or "license" for more information.
>>> import grovepi
>>> addr = 0x05
>>> grovepi.debugEnable()
>>> potentiometer = 0
>>> grovepi.pinMode(potentiometer,"INPUT")
1
>>> grovepi.analogRead(potentiometer)
0
[11, 2, 190, 255, 255, 255, 255, 255, 255, 255, 255, 255, 255, 255, 255, 255, 255, 255, 255, 255, 255, 255, 255, 255, 255, 255, 255, 255, 255, 255, 255, 255]
702
>>> ultrasonic_ranger = 2
>>> grovepi.ultrasonicRead(ultrasonic_ranger)
0
[11, 0, 3, 255, 255, 255, 255, 255, 255, 255, 255, 255, 255, 255, 255, 255, 255, 255, 255, 255, 255, 255, 255, 255, 255, 255, 255, 255, 255, 255, 255, 255]
3
>>> power=7
>>> grovepi.pinMode(power,"OUTPUT")
1
>>> grovepi.digitalWrite(power,1)
1
>>> grovepi.digitalWrite(power,0)
1
>>> grovepi.bus.write_i2c_block_data(5, 1, [3] + [0, 0, 0])
>>> grovepi.bus.read_i2c_block_data(5, 1)
[0, 2, 190, 255, 255, 255, 255, 255, 255, 255, 255, 255, 255, 255, 255, 255, 255, 255, 255, 255, 255, 255, 255, 255, 255, 255, 255, 255, 255, 255, 255, 255]
>>> grovepi.bus.write_i2c_block_data(5, 1, [3] + [0, 0, 0])
>>> grovepi.read_i2c_byte(addr)
0
>>> grovepi.bus.read_i2c_block_data(5, 1)
[0, 2, 190, 255, 255, 255, 255, 255, 255, 255, 255, 255, 255, 255, 255, 255, 255, 255, 255, 255, 255, 255, 255, 255, 255, 255, 255, 255, 255, 255, 255, 255]
>>> grovepi.read_i2c_byte(addr)
0
>>> grovepi.read_i2c_block(addr)
[0, 255, 255, 255, 255, 255, 255, 255, 255, 255, 255, 255, 255, 255, 255, 255, 255, 255, 255, 255, 255, 255, 255, 255, 255, 255, 255, 255, 255, 255, 255, 255]
>>> grovepi.read_i2c_block(addr)
[0, 255, 255, 255, 255, 255, 255, 255, 255, 255, 255, 255, 255, 255, 255, 255, 255, 255, 255, 255, 255, 255, 255, 255, 255, 255, 255, 255, 255, 255, 255, 255]
>>> grovepi.read_i2c_block(addr)
[0, 255, 255, 255, 255, 255, 255, 255, 255, 255, 255, 255, 255, 255, 255, 255, 255, 255, 255, 255, 255, 255, 255, 255, 255, 255, 255, 255, 255, 255, 255, 255]
>>> grovepi.read_i2c_block(addr)
[0, 255, 255, 255, 255, 255, 255, 255, 255, 255, 255, 255, 255, 255, 255, 255, 255, 255, 255, 255, 255, 255, 255, 255, 255, 255, 255, 255, 255, 255, 255, 255]
>>> grovepi.read_i2c_block(addr)
[11, 2, 255, 255, 255, 255, 255, 255, 255, 255, 255, 255, 255, 255, 255, 255, 255, 255, 255, 255, 255, 255, 255, 255, 255, 255, 255, 255, 255, 255, 255, 255]
>>> 


pi@raspberrypi ~ $ cat /dev/ttyUSB0
CMD = 5, index =  4

CMD = 3, index =  4

DATA = 0, 2, 190

CMD = 3, index =  0

CMD = 7, index =  4

DATA = 0, 0, 3

CMD = 7, index =  0

CMD = 5, index =  4

CMD = 2, index =  4

CMD = 2, index =  4

CMD = 3, index =  4

CMD = 3, index =  0

DATA = 0, 2, 190

CMD = 3, index =  4

DATA = 0, 2, 190

CMD = 3, index =  0

DATA = 0, 2, 190

DATA = 0, 2, 190

CMD = 1, index =  1

DATA = 0, 2, 190

CMD = 1, index =  2

DATA = 0, 2, 190

CMD = 1, index =  3

DATA = 0, 2, 190

CMD = 1, index =  4

DATA = 0, 2, 190

CMD = 1, index =  0
#