無論打算作什麼相機應用,即便只是想玩玩而已,需要有個相機的吧。這裡匯總樹莓派基金會官方版 RaspiCAM 一些資料鍊結,方便有興趣的讀者參考。
【硬體規格】
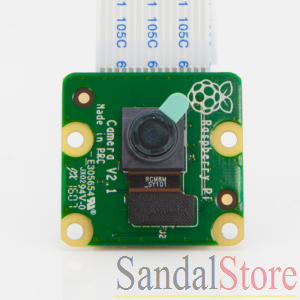
Camera Module
The Raspberry Pi Camera Module is an official product from the Raspberry Pi Foundation. The original 5-megapixel model was released in 2013, and an 8-megapixel Camera Module v2 was released in 2016. For both iterations, there are visible light and infrared versions.
Hardware specification
| Camera Module v1 | Camera Module v2 | |
|---|---|---|
| Net price | $25 | $25 |
| Size | Around 25 × 24 × 9 mm | |
| Weight | 3g | |
| Still resolution | 5 Megapixels | 8 Megapixels |
| Video modes | 1080p30, 720p60 and 640 × 480p60/90 | 1080p30, 720p60 and 640 × 480p60/90 |
| Linux integration | V4L2 driver available | V4L2 driver available |
| C programming API | OpenMAX IL and others available | OpenMAX IL and others available |
| Sensor | OmniVision OV5647 | Sony IMX219 |
| Sensor resolution | 2592 × 1944 pixels | 3280 × 2464 pixels |
| Sensor image area | 3.76 × 2.74 mm | |
| Pixel size | 1.4 µm × 1.4 µm | |
| Optical size | 1/4″ | |
| Full-frame SLR lens equivalent | 35 mm | |
| S/N ratio | 36 dB | |
| Dynamic range | 67 dB @ 8x gain | |
| Sensitivity | 680 mV/lux-sec | |
| Dark current | 16 mV/sec @ 60 C | |
| Well capacity | 4.3 Ke- | |
| Fixed focus | 1 m to infinity | |
| Focal length | 3.60 mm +/- 0.01 | |
| Horizontal field of view | 53.50 +/- 0.13 degrees | |
| Vertical field of view | 41.41 +/- 0.11 degrees | |
| Focal ratio (F-Stop) | 2.9 |
……
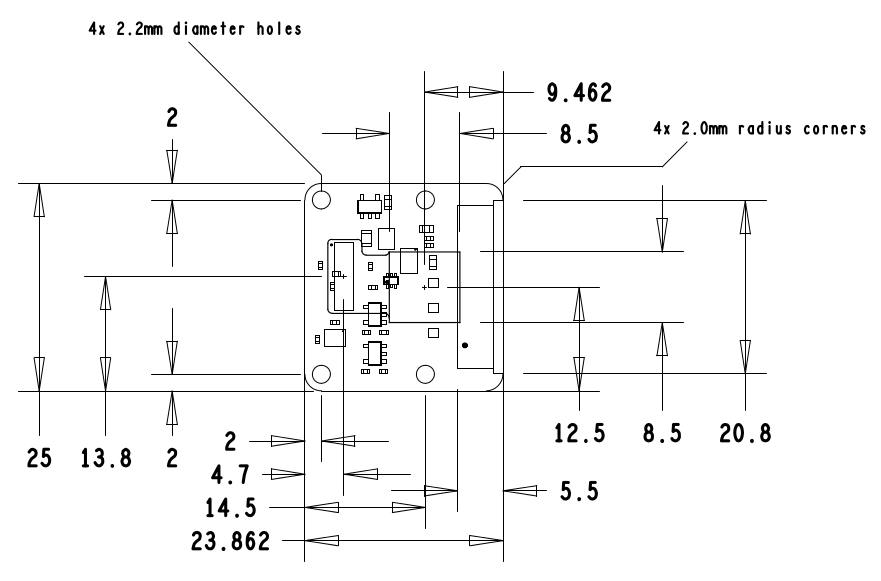
【機構圖】
【命令列應用程式】
Raspberry Pi Camera Module
This document describes the use of the three Raspberry Pi camera applications, as of January 8th 2015.
There are three applications provided: raspistill, raspivid, and raspistillyuv. raspistill and raspistillyuv are very similar and are intended for capturing images; raspivid is for capturing video.
All the applications are driven from the command line, and written to take advantage of the MMAL API which runs over OpenMAX. The MMAL API provides an easier to use system than that presented by OpenMAX. Note that MMAL is a Broadcom-specific API used only on Videocore 4 systems.
The applications use up to four OpenMAX (MMAL) components: camera, preview, encoder, and null_sink. All applications use the camera component; raspistill uses the Image Encode component; raspivid uses the Video Encode component; and raspistillyuv doesn’t use an encoder, and sends its YUV or RGB output directly from the camera component to file.
The preview display is optional, but can be used full-screen or directed to a specific rectangular area on the display. If preview is disabled, the null_sink component is used to ‘absorb’ the preview frames. The camera must produce preview frames even if these aren’t required for display, as they’re used for calculating exposure and white balance settings.
In addition, it’s possible to omit the filename option (in which case the preview is displayed but no file is written), or to redirect all output to stdout.
Command line help is available by typing just the application name in the command line.
Setting up
See Camera Setup.
【關掉 RaspiCAM LED 燈】
Disable camera led on Pi3
Apparently due to gpio changes on the Pi3 b disable_camera_led=1 no longer works.
Any ideas of anther way anyone?
───
disable_camera_led=1 on some clone camera boards fails – they used the LED line for other purposes. Sorry, can’t fix that one, and it just shows that reverse engineering is prone to mistakes.
It should work fine on a Pi3 – it just signals the driver to only toggle one of the GPIOs (which one is configured in the firmware dt-blob) instead of both.
https://github.com/raspberrypi/firmware … t-blob.dts hasn’t been updated as yet, but there appears to have been some changes made and the two camera GPIOs are on a GPIO expander.
It will mean that using PiCamera’s led function will fail as it doesn’t know about the Pi3. I’m not even sure if it is possible to get to those GPIOs from Linux – I’ll find out as I want to for getting raw access to the camera.
There’s an outside chance that the two GPIOs specified in the blob are swapped. That would also explain why it can’t find the camera if disable_camera_led is set.
I’ll email Pi Towers, but also try to have a look tonight (I haven’t actually powered my Pi3 up as yet!).
───
A rebuild of the dt-blob.bin swapping the two lines and it works again even with disable_camera_led=1.For a couple of reasons that I won’t go into I can’t release that patched file – sorry. I’ll pass the patch across to Pi Towers and it should be available via sudo rpi-update fairly quickly.
……
Official V4L2 driver
EDIT: the default kernel includes v4l2 driver and the latest raspbian image includes the v4l2 utilities (like v4l2-ctl) so the initial steps can be skipped. Skip forward to the modprobe line.
rpi-update to get it. Consider this beta for now.
Some info is here (in linux tree):
https://github.com/raspberrypi/linux/bl … 5-v4l2.txt
You need a version 1.0 or later of v4l2-ctl, available from:
git://git.linuxtv.org/v4l-utils.git
i.e
sudo apt-get install autoconf gettext libtool libjpeg62-dev
cd v4l-utils
autoreconf -vfi
./configure
make
sudo make install
This takes about fifteen minutes.
You need to have camera enabled and sufficient gpu_mem configured (much like raspicam).
Some commands to get started:
# load the module
sudo modprobe bcm2835-v4l2
# viewfinder
v4l2-ctl –overlay=1 # enable viewfinder
v4l2-ctl –overlay=0 # disable viewfinder
# record video
v4l2-ctl –set-fmt-video=width=1920,height=1088,pixelformat=4
v4l2-ctl –stream-mmap=3 –stream-count=100 –stream-to=somefile.264
# capture jpeg
v4l2-ctl –set-fmt-video=width=2592,height=1944,pixelformat=3
v4l2-ctl –stream-mmap=3 –stream-count=1 –stream-to=somefile.jpg
# set bitrate
v4l2-ctl –set-ctrl video_bitrate=10000000
# list supported formats
v4l2-ctl –list-formats
In theory (some) apps that use V4L should work. Report back what does work and what doesn’t.
Thanks to Vincent Sanders at Collabora, and Luke Diamand and David Stevenson at Broadcom for working on this.
……