現在我們已經知道 ID EEPROM 的資料格式和內容,那麼如何產生 .epp 檔案呢?想當然耳得用 eepmake 的了。不過它的唯一說明是︰
pi@raspberrypi:~/hats/eepromutils
![./eepmake Wrong input format. Try 'eepmake input_file output_file [dt_file] [-c custom_file_1 ... custom_file_n]' pi@raspberrypi:~/hats/eepromutils](http://www.freesandal.org/wp-content/ql-cache/quicklatex.com-82676f6eec410ba7f8df40da7e478570_l3.png "Rendered by QuickLaTeX.com")
,這樣該怎麼用勒!也許有時曉得程式的用法之途徑,就是閱讀其『原始碼』以及各種『相關檔』文本。然後順著『麵包屑』走︰
| /* |
| * Parses EEPROM text file and createds binary .eep file |
| * Usage: eepmake input_file output_file |
| */ |
| #include <stdio.h> |
| #include <stdlib.h> |
| #include <ctype.h> |
| #include <string.h> |
| #include <stdbool.h> |
| #include <fcntl.h> |
| #include “eeptypes.h“ |
| #define HEADER_SIGN 0x69502d52 //”R-Pi” in ASCII reversed for endianness |
| ……… |
如是自會發現︰
| ######################################################################## |
| # EEPROM settings text file |
| # |
| # Edit this file for your particular board and run through eepmake tool, |
| # then use eepflash tool to write to attached HAT ID EEPROM |
| # |
| # Tools available: |
| # eepmake Parses EEPROM text file and creates binary .eep file |
| # eepdump Dumps a binary .eep file as human readable text (for debug) |
| # eepflash Write or read .eep binary image to/from HAT EEPROM |
| # |
| ######################################################################## |
| ######################################################################## |
| # Vendor info |
| # 128 bit UUID. If left at zero eepmake tool will auto-generate |
| # RFC 4122 compliant UUID |
| product_uuid 00000000-0000-0000-0000-000000000000 |
| # 16 bit product id |
| product_id 0x0000 |
| # 16 bit product version |
| product_ver 0x0000 |
| # ASCII vendor string (max 255 characters) |
| vendor “ACME Technology Company” |
| # ASCII product string (max 255 characters) |
| product “Special Sensor Board” |
| ######################################################################## |
| # GPIO bank settings, set to nonzero to change from the default. |
| # NOTE these setting can only be set per BANK, uncommenting any of |
| # these will force the bank to use the custom setting. |
| # drive strength, 0=default, 1-8=2,4,6,8,10,12,14,16mA, 9-15=reserved |
| gpio_drive 0 |
| # 0=default, 1=slew rate limiting, 2=no slew limiting, 3=reserved |
| gpio_slew 0 |
| # 0=default, 1=hysteresis disabled, 2=hysteresis enabled, 3=reserved |
| gpio_hysteresis 0 |
| # If board back-powers Pi via 5V GPIO header pins: |
| # 0 = board does not back-power |
| # 1 = board back-powers and can supply the Pi with a minimum of 1.3A |
| # 2 = board back-powers and can supply the Pi with a minimum of 2A |
| # 3 = reserved |
| # If back_power=2 then USB high current mode will be automatically |
| # enabled on the Pi |
| back_power 0 |
| ######################################################################## |
| # GPIO pins, uncomment for GPIOs used on board |
| # Options for FUNCTION: INPUT, OUTPUT, ALT0-ALT5 |
| # Options for PULL: DEFAULT, UP, DOWN, NONE |
| # NB GPIO0 and GPIO1 are reserved for ID EEPROM so cannot be set |
| # GPIO FUNCTION PULL |
| # —- ——– —- |
| #setgpio 2 INPUT DEFAULT |
| #setgpio 3 INPUT DEFAULT |
| #setgpio 4 INPUT DEFAULT |
| #setgpio 5 INPUT DEFAULT |
| #setgpio 6 INPUT DEFAULT |
| #setgpio 7 INPUT DEFAULT |
| #setgpio 8 INPUT DEFAULT |
| #setgpio 9 INPUT DEFAULT |
| #setgpio 10 INPUT DEFAULT |
| #setgpio 11 INPUT DEFAULT |
| #setgpio 12 INPUT DEFAULT |
| #setgpio 13 INPUT DEFAULT |
| #setgpio 14 INPUT DEFAULT |
| #setgpio 15 INPUT DEFAULT |
| #setgpio 16 INPUT DEFAULT |
| #setgpio 17 INPUT DEFAULT |
| #setgpio 18 INPUT DEFAULT |
| #setgpio 19 INPUT DEFAULT |
| #setgpio 20 INPUT DEFAULT |
| #setgpio 21 INPUT DEFAULT |
| #setgpio 22 INPUT DEFAULT |
| #setgpio 23 INPUT DEFAULT |
| #setgpio 24 INPUT DEFAULT |
| #setgpio 25 INPUT DEFAULT |
| #setgpio 26 INPUT DEFAULT |
| #setgpio 27 INPUT DEFAULT |
eepmake input_file 格式的哩。
從『原始碼』也可以證實 128 bit UUID 不需要給, eepmake 會自動產生︰
	/* Vendor info related part */
# line 198

if (strcmp(cmd, "product_uuid")==0) {
        product_serial_set = true; //required field
        high1 = 0; high2 = 0;

        sscanf(c, "%100s %08x-%04x-%04x-%04x-%04x%08x\n", cmd, &vinf->serial_4,
&high1, &vinf->serial_3, &high2, &vinf->serial_2, &vinf->serial_1);

        vinf->serial_3 |= high1<<16;
        vinf->serial_2 |= high2<<16;

        if ((vinf->serial_4==0) && (vinf->serial_3==0) && (vinf->serial_2==0) && (vinf->serial_1==0)) {
                //read 128 random bits from /dev/urandom
                int random_file = open("/dev/urandom", O_RDONLY);
                ssize_t result = read(random_file, &vinf->serial_1, 16);
                close(random_file);
                if (result <= 0) printf("Unable to read from /dev/urandom to set up UUID");
                else {
                        //put in the version
                        vinf->serial_3 = (vinf->serial_3 & 0xffff0fff) | 0x00004000;

                        //put in the variant
                        vinf->serial_2 = (vinf->serial_2 & 0x3fffffff) | 0x80000000;
                        printf("UUID=%08x-%04x-%04x-%04x-%04x%08x\n", vinf->serial_4, vinf->serial_3>>16, vinf->serial_3 & 0xffff, vinf->serial_2>>16, vinf->serial_2 & 0xffff, vinf->serial_1);
                }
        }
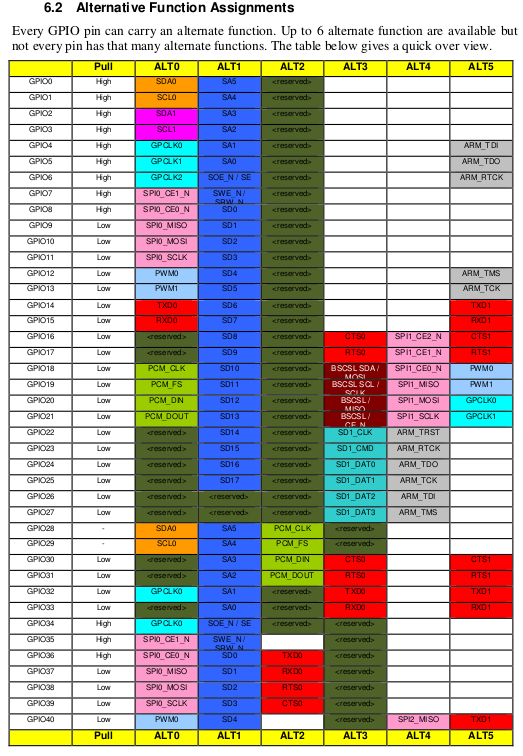
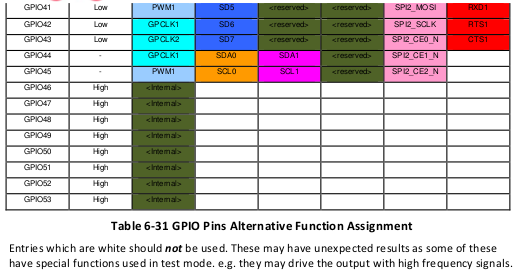
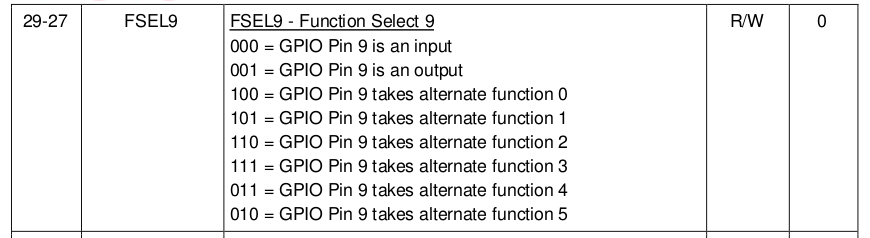
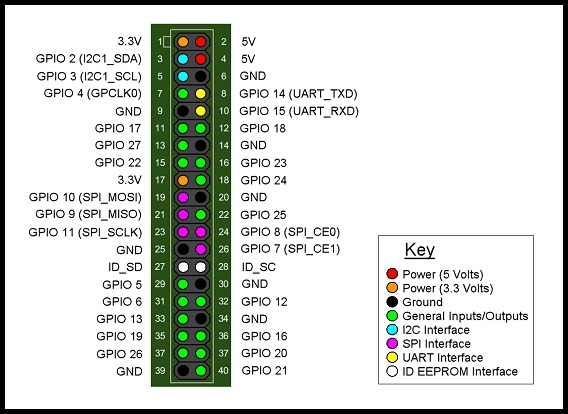
因此剩下的事就是好好了解 40W GPIOs 怎麼設定的也☆